
CodeX Deployment Guide
Enterprise AI Coding Assistant – Complete Deployment Manual
| Resource | URL |
|---|---|
| Official docs | developers.openai.com/codex |
📋 Prerequisites
Complete the Node.js installation and CC-Switch tool installation first.
🎯 Quick Navigation
CodeX is the next-generation intelligent coding assistant built on the GPT-5 architecture, delivering outstanding code generation and optimization for developers.
Deployment path: system environment setup ➜ CLI tool installation ➜ API integration ➜ ready to code
🚀 Quick Setup with CC-Switch (Recommended)
⚠️ Prerequisite
Before configuring CodeX with CC-Switch, make sure the CodeX CLI is globally installed via npm:
npm install -g @openai/codex@latestVerify the installation: codex --version
We recommend using the CC-Switch quick configuration tool for a GUI-based setup that requires no command-line work.
Configuration Steps
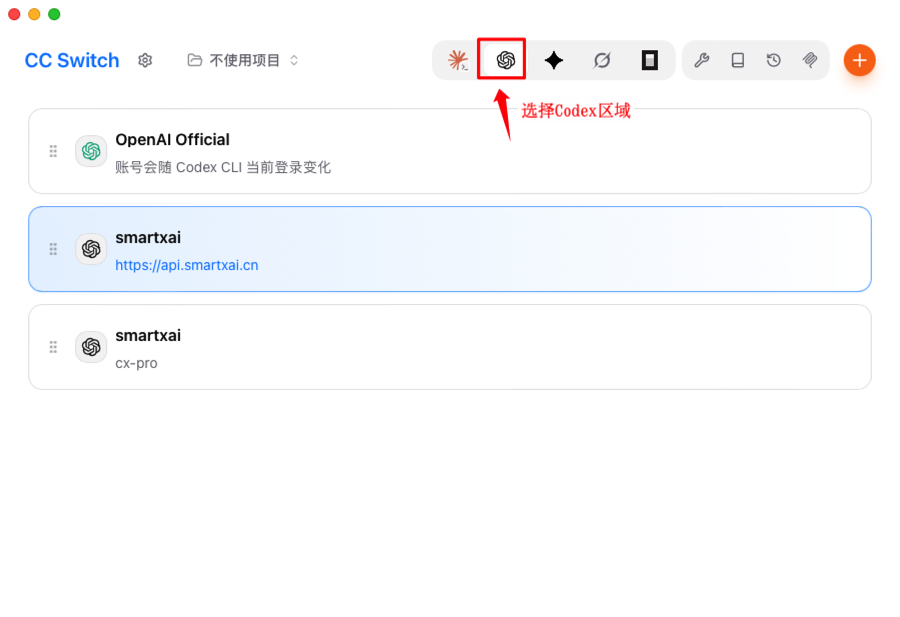
1. Launch CC-Switch and switch to the Codex tab
- Open the CC-Switch app
- Click the Codex tab at the top
- Click the orange + button in the upper-right to add a new configuration
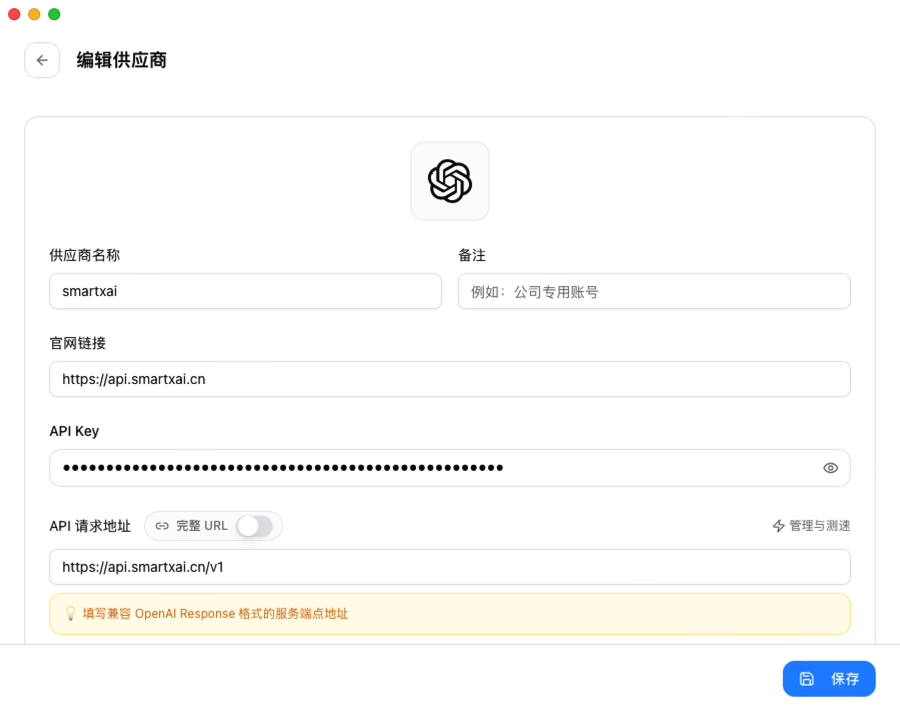
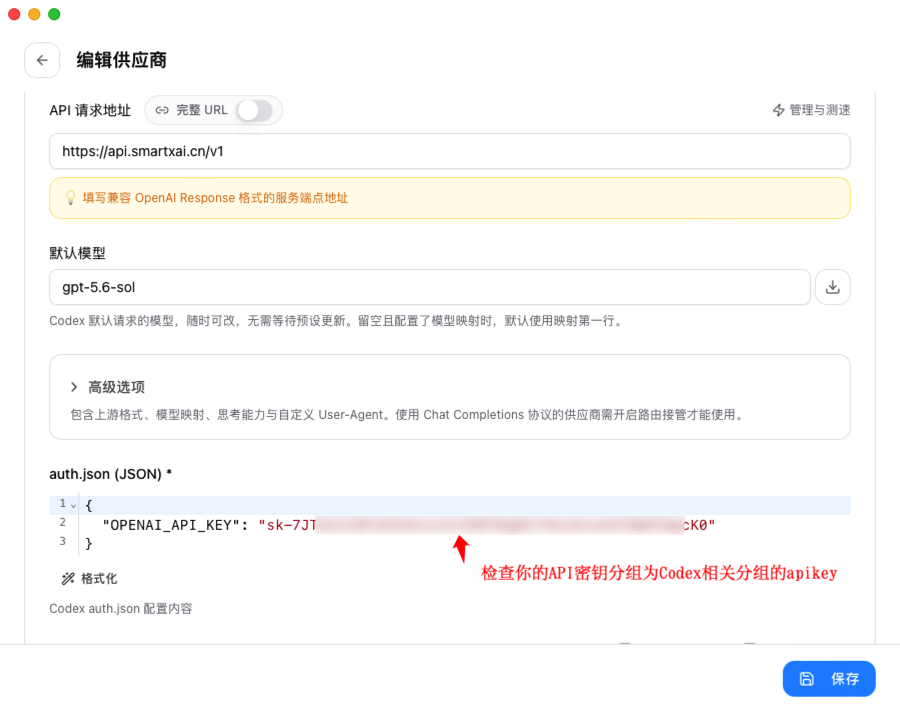
2. Fill in the CodeX provider configuration
- Provider name: any name you like (e.g. "Smartx AI")
- Base URL: enter
https://api.smartxai.cn/v1 - API Key: paste the API Key with access to the Codex model you selected you obtained from the Smartx AI platform
- Model: select
gpt-5.4(5.4 is the latest model at the time of writing) - Other options: adjust reasoning effort, network access, and other parameters as needed
- Click Save
💡 Tips
- CC-Switch automatically creates
~/.codex/config.tomlandauth.json - You can add multiple provider configurations and switch at any time
- After switching, close and reopen CodeX for the change to take effect
3. Activate the configuration
- Find the Smartx AI entry you just created in the configuration list
- Click the Use button to the right of the entry
- The configuration is marked as Active (green badge)
- Restart CodeX and the new configuration takes effect
4. Quick switching from the system tray
CC-Switch supports quick switching of CodeX configurations from the system tray:
- Right-click the CC-Switch icon in the system tray
- Select the Codex category in the menu
- Pick the configuration you want
- The switch takes effect immediately, no need to open the main window
⚠️ Notes
- Confirm that the token's user group and model permissions include the Codex model you selected
- CodeX API Keys and Claude Code API Keys are not interchangeable
- After switching configurations, restart CodeX for the change to take effect
- You can test API endpoint speed inside CC-Switch
⌨️ Manual Command-Line Setup
If you prefer not to use CC-Switch, follow the steps below to configure CodeX manually.
🖥️ Windows
Step 1: Install the CodeX CLI
Open Command Prompt or PowerShell as Administrator and run:
npm install -g @openai/codex@latest
codex --versionStep 2: Integrate the Smartx AI API service
Get your API credentials:
- Visit the Smartx AI console
- Sign up or log in
- Navigate to the API Key management section
- When creating a token, set its quota, expiration, and model permissions as needed
- Save the generated API Key securely
🔐 Security reminder
CodeX and Claude Code use different API protocols. Whether you need a separate token depends on the permissions configured in the console; follow the models returned by the API.
Create the configuration directory:
mkdir %USERPROFILE%\.codex
cd %USERPROFILE%\.codexCreate the configuration file: config.toml
model_provider = "Smartx AI"
model = "gpt-5.4"
model_reasoning_effort = "xhigh"
disable_response_storage = true
approval_policy = "on-request"
sandbox_mode = "danger-full-access"
model_supports_reasoning_summaries = true

[model_providers.Smartx AI]
name = "smartxai"
base_url = "https://api.smartxai.cn/v1"
wire_api = "responses"
requires_openai_auth = trueCreate the auth file: auth.json
{
  "OPENAI_API_KEY": "Paste your CodeX API Key here"
}Step 3: Initialize a workspace
mkdir my-codex-project
cd my-codex-project
codex🍏 macOS
Install the CodeX CLI
npm install -g @openai/codex@latest
codex --versionIntegrate the API service
Create the configuration directory:
mkdir -p ~/.codex
cd ~/.codexCreate config.toml:
cat > config.toml << 'EOF'
model_provider = "Smartx AI"
model = "gpt-5.4"
model_reasoning_effort = "xhigh"
disable_response_storage = true
approval_policy = "on-request"
sandbox_mode = "danger-full-access"
model_supports_reasoning_summaries = true

[model_providers.Smartx AI]
name = "smartxai"
base_url = "https://api.smartxai.cn/v1"
wire_api = "responses"
requires_openai_auth = true
EOFCreate auth.json:
cat > auth.json << 'EOF'
{
  "OPENAI_API_KEY": "Paste your CodeX API Key here"
}
EOFInitialize a workspace
mkdir my-codex-project
cd my-codex-project
codex🐧 Linux
Install the CodeX CLI
sudo npm install -g @openai/codex@latest
codex --versionIntegrate the API service
Create the configuration directory:
mkdir -p ~/.codex
cd ~/.codexCreate config.toml:
cat > config.toml << 'EOF'
model_provider = "Smartx AI"
model = "gpt-5.4"
model_reasoning_effort = "xhigh"
disable_response_storage = true
approval_policy = "on-request"
sandbox_mode = "danger-full-access"
model_supports_reasoning_summaries = true

[model_providers.Smartx AI]
name = "smartxai"
base_url = "https://api.smartxai.cn/v1"
wire_api = "responses"
requires_openai_auth = true
EOFCreate auth.json:
cat > auth.json << 'EOF'
{
  "OPENAI_API_KEY": "Paste your CodeX API Key here"
}
EOFInitialize a workspace
mkdir my-codex-project
cd my-codex-project
codexFAQ
Are CodeX and Claude Code API Keys interchangeable?
Not necessarily. The platform authorizes requests using token permissions, user groups, and model configuration. Reuse one Key when it has access to the target model and the client protocol is compatible; otherwise create a separate Key in the console.
Where are the configuration files stored?
- Windows:
%USERPROFILE%\.codex\ - macOS/Linux:
~/.codex/
More questions
See the FAQ or contact after-sales support.